程序员徐公

微信公众号:【徐公】

0%

在日常开发中,我们经常需要用到上传图片的 功能,这个时候通常有两种做法,第一种,从相机获取,第二种,从相册获取。今天这篇博客主要讲解利用系统的Intent怎样获取?

主要内容如下

  • 怎样通过相机获取我们的图片
  • 怎样启动相册获取我们想要的图片
  • 在Android 6.0中的动态权限处理】
  • 调用系统Intent和自定义相册的优缺点对比

怎样通过相机获取我们的图片

总共有两种方式,

第一种方式:

第一步,通过 MediaStore.ACTION_IMAGE_CAPTURE 启动我们的相机

1
2
Intent pIntent = new Intent(MediaStore.ACTION_IMAGE_CAPTURE);//调用摄像头action
startActivityForResult(pIntent, INTENT_CODE_IMAGE_CAPTURE1);//requestcode

第二步,在onActivityResult进行处理,,核心代码如下

1
2
3
4
5
6
7
8
9
10
11
12
13
14
15
16
17
18
@Override
protected void onActivityResult(int requestCode, int resultCode, Intent data) {
super.onActivityResult(requestCode, resultCode, data);
switch (requestCode) {
case INTENT_CODE_IMAGE_CAPTURE1:
if (resultCode == RESULT_OK) {
Bundle pBundle = data.getExtras(); //从intent对象中获取数据,

if (pBundle != null) {
Bitmap pBitmap = (Bitmap) pBundle.get("data");
if (pBitmap != null) {
mIv.setImageBitmap(pBitmap);
}
}
}
break;

}

第二种 方式

第一步,通过 MediaStore.ACTION_IMAGE_CAPTURE 启动相机,并指定 MediaStore.EXTRA_OUTPUT ,intent.putExtra(MediaStore.EXTRA_OUTPUT, Uri.fromFile(mFile)); 传入我们的URI,这样,最终返回的信息会存储在我们的mFile中。

1
2
3
4
5
6
7
8
9
10
11
12
13
14
15
16
17
18
19
20
21
22
23
24
25
private void startCameraWithHighBitmap() {
//确定存储拍照得到的图片文件路径
if (Environment.getExternalStorageState().equals(Environment.MEDIA_MOUNTED)) {
mFile = new File(Environment.getExternalStorageDirectory(),
getName());
} else {
Toast.makeText(this, "请插入sd卡", Toast.LENGTH_SHORT).show();
return;
}

try {
mFile.createNewFile();
} catch (IOException e) {
e.printStackTrace();
}

Intent intent = new Intent();
intent.setAction(MediaStore.ACTION_IMAGE_CAPTURE);
//加载Uri型的文件路径
intent.putExtra(MediaStore.EXTRA_OUTPUT, Uri.fromFile(mFile));
//向onActivityResult发送intent,requestCode为INTENT_CODE_IMAGE_CAPTURE2
startActivityForResult(intent, INTENT_CODE_IMAGE_CAPTURE2);
}


第二步:在onActivityResult进行处理,并对图片进行相应的压缩,防止在大图片的情况下发生OOM

1
2
3
4
5
6
7
8
9
case INTENT_CODE_IMAGE_CAPTURE2:
if (resultCode == RESULT_OK) {
Bitmap bitmap = ImageZip.decodeSampledBitmapFromFile(mFile.getAbsolutePath(),
mWidth, mHeight);
mIv.setImageBitmap(bitmap);
}
break;


1
2
3
4
5
6
7
8
9
10
11
12
13
14
15
16
17
18
19
20
21
22
23
24
25
26
27
28
29
30
31
32
33
    public static Bitmap decodeSampledBitmapFromFile(String pathName, int reqWidth, int reqHeight) {
final BitmapFactory.Options options = new BitmapFactory.Options();
options.inJustDecodeBounds = true;
BitmapFactory.decodeFile(pathName, options);
options.inSampleSize = calculateInSampleSize(options, reqWidth, reqHeight);
options.inJustDecodeBounds = false;
Bitmap src = BitmapFactory.decodeFile(pathName, options);
// return createScaleBitmap(src, reqWidth, reqHeight, options.inSampleSize);
return src;
}


private static int calculateInSampleSize(BitmapFactory.Options options,
int reqWidth, int reqHeight) {
// 源图片的高度和宽度
final int height = options.outHeight;
final int width = options.outWidth;
int inSampleSize = 1;
if (height > reqHeight || width > reqWidth) {
final int halfHeight = height / 2;
final int halfWidth = width / 2;
// Calculate the largest inSampleSize value that is a power of 2 and keeps both
// height and width larger than the requested height and width.
while ((halfHeight / inSampleSize) > reqHeight && (halfWidth / inSampleSize) > reqWidth) {
inSampleSize *= 2;
}
}
return inSampleSize;
}


两种方法的区别

第一种方法获取的bitmap是被缩放的bitmap,第二种方法获取的bitmap是完整的bitmap,实际使用中根据需求情况决定使用哪一种方法。

官网参考地址


怎样启动相册获取我们想要的图片

第一步,通过 Intent.ACTION_GET_CONTENT 这个Intent,并设置相应的type,启动相册。

1
2
3
4
5
6
Intent i = new Intent(Intent.ACTION_GET_CONTENT, null);
i.setDataAndType(MediaStore.Images.Media.EXTERNAL_CONTENT_URI, "image/*");
startActivityForResult(i, INTENT_CODE_IMAGE_GALLERY1);


第二步,在onActivityResult中对返回的uri数据进行处理

  • 需要注意的是:这里我们需要注意是不是MIUI系统,如果不是MIUI系统,我们只需要进行一下处理,就OK了
1
2
3
4
5
6
7
8
9
10
11
12
13
14
15
16
17
18
19
20
private void setPhotoForNormalSystem(Intent data) {
String filePath = getRealPathFromURI(data.getData());
Bitmap bitmap = ImageZip.decodeSampledBitmapFromFile(filePath, mWidth, mHeight);
mIv.setImageBitmap(bitmap);
}

/**
* 解析Intent.getdata()得到的uri为String型的filePath
*
* @param contentUri
* @return
*/
public String getRealPathFromURI(Uri contentUri) {
String[] proj = {MediaStore.Audio.Media.DATA};
Cursor cursor = managedQuery(contentUri, proj, null, null, null);
int column_index = cursor.getColumnIndexOrThrow(MediaStore.Audio.Media.DATA);
cursor.moveToFirst();
return cursor.getString(column_index);
}

  • 如果是MIUI系统,我们需要进行一下处理
1
2
3
4
5
6
7
8
9
10
11
12
13
14
15
16
17
18
19
private void setPhotoForMiuiSystem(Intent data) {
Uri localUri = data.getData();
String scheme = localUri.getScheme();
String imagePath = "";
if ("content".equals(scheme)) {
String[] filePathColumns = {MediaStore.Images.Media.DATA};
Cursor c = getContentResolver().query(localUri, filePathColumns, null, null, null);
c.moveToFirst();
int columnIndex = c.getColumnIndex(filePathColumns[0]);
imagePath = c.getString(columnIndex);
c.close();
} else if ("file".equals(scheme)) {//小米4选择云相册中的图片是根据此方法获得路径
imagePath = localUri.getPath();
}
Bitmap bitmap = ImageZip.decodeSampledBitmapFromFile(imagePath, mWidth, mHeight);
mIv.setImageBitmap(bitmap);
}


在代码中的体现如下,即判断是否是MIUI系统,对于不同的系统采用不同的方法

1
2
3
4
5
6
7
8
9
10
11
12
13
14
15
16
17
18
19
@Override
protected void onActivityResult(int requestCode, int resultCode, Intent data) {
super.onActivityResult(requestCode, resultCode, data);
if (resultCode != RESULT_OK) {
return;
}
switch (requestCode) {
case INTENT_CODE_IMAGE_GALLERY1:
if (SystemUtils.isMIUI()) {
setPhotoForMiuiSystem(data);
} else {
setPhotoForNormalSystem(data);
}
break;

}
}


Android6.0动态权限管理

我们知道在Android6.0以上的系统,有一些权限需要动态授予

1
2
3
4
5
6
7
8
9
10
11
12
13
14
15
16
17
18
19
20
21
22
23
24
25
26
27
28
29
30
31
32
33
34
35
36
37
38
39
40
41
42
group:android.permission-group.CONTACTS
permission:android.permission.WRITE_CONTACTS
permission:android.permission.GET_ACCOUNTS
permission:android.permission.READ_CONTACTS

group:android.permission-group.PHONE
permission:android.permission.READ_CALL_LOG
permission:android.permission.READ_PHONE_STATE
permission:android.permission.CALL_PHONE
permission:android.permission.WRITE_CALL_LOG
permission:android.permission.USE_SIP
permission:android.permission.PROCESS_OUTGOING_CALLS
permission:com.android.voicemail.permission.ADD_VOICEMAIL

group:android.permission-group.CALENDAR
permission:android.permission.READ_CALENDAR
permission:android.permission.WRITE_CALENDAR

group:android.permission-group.CAMERA
permission:android.permission.CAMERA

group:android.permission-group.SENSORS
permission:android.permission.BODY_SENSORS

group:android.permission-group.LOCATION
permission:android.permission.ACCESS_FINE_LOCATION
permission:android.permission.ACCESS_COARSE_LOCATION

group:android.permission-group.STORAGE
permission:android.permission.READ_EXTERNAL_STORAGE
permission:android.permission.WRITE_EXTERNAL_STORAGE

group:android.permission-group.MICROPHONE
permission:android.permission.RECORD_AUDIO

group:android.permission-group.SMS
permission:android.permission.READ_SMS
permission:android.permission.RECEIVE_WAP_PUSH
permission:android.permission.RECEIVE_MMS
permission:android.permission.RECEIVE_SMS
permission:android.permission.SEND_SMS
permission:android.permission.READ_CELL_BROADCASTS

我们这里容易 得知读取相机需要的权限有,写sd卡权限,读取camera权限,这两个权限都需要动态授予。

这里我们以检查是否授予camera权限为例子讲解

第一步,在启动相机的时候检查时候已经授予camera权限,没有的话 ,请求camera权限

1
2
3
4
5
6
7
8
9
10
11
12
13
14
15
16
17
18
19
20
21
22
23
24
25
26
27
28
29
30
31
32
33
34
35
36
37
38
39
if (ContextCompat.checkSelfPermission(this, permission)
!= PackageManager.PERMISSION_GRANTED) {//还没有授予权限
if (ActivityCompat.shouldShowRequestPermissionRationale(this, permission)) {
Toast.makeText(this, "您已禁止该权限,需要重新开启。", Toast.LENGTH_SHORT).show();
} else {
ActivityCompat.requestPermissions(this, new String[]{permission},
request_camera2);
}

}else{// 已经授予权限
startCameraWithHighBitmap();
}


private void startCameraWithHighBitmap() {
//确定存储拍照得到的图片文件路径
if (Environment.getExternalStorageState().equals(Environment.MEDIA_MOUNTED)) {
mFile = new File(Environment.getExternalStorageDirectory(),
getName());
} else {
Toast.makeText(this, "请插入sd卡", Toast.LENGTH_SHORT).show();
return;
}

try {
mFile.createNewFile();
} catch (IOException e) {
e.printStackTrace();
}

Intent intent = new Intent();
intent.setAction(MediaStore.ACTION_IMAGE_CAPTURE);
//加载Uri型的文件路径
intent.putExtra(MediaStore.EXTRA_OUTPUT, Uri.fromFile(mFile));
//向onActivityResult发送intent,requestCode为INTENT_CODE_IMAGE_CAPTURE2
startActivityForResult(intent, INTENT_CODE_IMAGE_CAPTURE2);
}


第二步:重写onRequestPermissionsResult方法,判断是否授权成功,成功的话启动相机,核心代码如下。

1
2
3
4
5
6
7
8
9
10
11
12
13
14
15
16
17
18
19
@Override
public void onRequestPermissionsResult(int requestCode, @NonNull String[] permissions,
@NonNull int[] grantResults) {
super.onRequestPermissionsResult(requestCode, permissions, grantResults);
switch (requestCode) {


case request_camera2:
if (grantResults[0] == PackageManager.PERMISSION_GRANTED) {
startCameraWithHighBitmap();
} else {
// Permission Denied
Toast.makeText(this, "Permission Denied", Toast
.LENGTH_SHORT).show();
}
break;

}
}

至于检查sd卡写权限的,这里不再阐述,有兴趣的话,可以下载源码看一下。

关于Android6.0动态获取权限的,可以参考这一篇博客在Android 6.0 设备上动态获取权限


调用系统Intent和自定义相册的优缺点对比

调用系统Intent启动相册

优点: 代码简洁

缺点:对于不同的手机厂商,room往往被修改了,有时候调用系统的Intent,会有一些一项不到的bug, 不能实现多张图片的选择

自定义相册

优点: 实现的样式可以自己定制,可以实现多张图片的选择等

缺点: 代码量稍微多一些

总结

综上所述,对于本地相册的功能,本人还是强烈推荐自己实现,因为采用系统的,灵活性差,更重要的是,经常会有一些 莫名其妙的bug

这里给大家推荐两种实现方式,一个是鸿洋大神以前写的,一个是GitHub的开源库。

Android 超高仿微信图片选择器 图片该这么加载

Android仿微信图片上传,可以选择多张图片,缩放预览,拍照上传等

android-multiple-images-selector


裁剪图片

关于裁剪图片的Intent,网上的大多数做法是

1
2
3
4
5
6
7
8
9
10
11
12
13
14
15
16
17
18
19
20
21
22
23
24
25
26
27
28
29
30
31
32
33
34
public static Intent cropPic(Uri imageUri) {

Intent intent = new Intent("com.android.camera.action.CROP");

intent.putExtra("crop", "true");

// 设置x,y的比例,截图方框就按照这个比例来截 若设置为0,0,或者不设置 则自由比例截图
intent.putExtra("aspectX", 2);
intent.putExtra("aspectY", 1);

// 裁剪区的宽和高 其实就是裁剪后的显示区域 若裁剪的比例不是显示的比例,
// 则自动压缩图片填满显示区域。若设置为0,0 就不显示。若不设置,则按原始大小显示
intent.putExtra("outputX", 200);
intent.putExtra("outputY", 100);

// 不知道有啥用。。可能会保存一个比例值 需要相关文档啊
intent.putExtra("scale", true);

// true的话直接返回bitmap,可能会很占内存 不建议
intent.putExtra("return-data", false);
// 上面设为false的时候将MediaStore.EXTRA_OUTPUT即"output"关联一个Uri
intent.putExtra("output", imageUri);
// 看参数即可知道是输出格式
intent.putExtra("outputFormat", Bitmap.CompressFormat.JPEG.toString());
// 面部识别 这里用不上
intent.putExtra("noFaceDetection", false);


return intent;
}


当你运行代码的时候,部分设备会报错,大致的意思是:com.android.camera.action.CROP 的Activity not found

解决方法,我们可以捕获一下异常,防止发生崩溃,并弹出吐司提醒用户不支持裁剪功能。

1
2
3
4
5
6
7
8
9
10
try{
Intent intent = IntentUtils.cropPic(Uri.fromFile(mF));
startActivityForResult(intent,req_crop);
}catch(ActivityNotFoundException a){
String errorMessage = "Your device doesn't support the crop action!";
Toast toast = Toast.makeText(this, errorMessage, Toast.LENGTH_SHORT);
toast.show();
}


当然,github上面有两个比较好的开源库

android-crop

cropper


文章首发地址CSDN:http://blog.csdn.net/gdutxiaoxu/article/details/53411790

源码下载地址:http://download.csdn.net/detail/gdutxiaoxu/9698246

Retrofit使用教程(一)- Retrofit入门详解


转载请注明博客地址:http://blog.csdn.net/gdutxiaoxu/article/details/52745491

源码下载地址:https://github.com/gdutxiaoxu/RetrofitDemo.git

本人已经好久没有更新 博客了,这次更新博客打算写一下retrofit的使用教程系列的 博客,写作思路大概如下

  • 先从retrofit的基本使用讲起;
  • 接着将retrofit结合RxJava的使用;
  • 接着讲Retrofit的封装使用,(包括错误统一处理);
  • 有时间和能力的话会尝试研究一下retrofit的 源码.

本篇博客主要讲解以下问题

  • Retrofit简介
  • Retrofit的简单使用例子
  • Retrofit的get请求
  • Retrofit的put请求(提交表单数据)
  • 如何为 retrofit添加header
  • 如何提交json数据

Retrofit简介

Retrofit是square开源的网络请求库,底层是使用OKHttp封装的,网络请求速度很快.

主要有一下几种请求方法

格式 含义
@GET 表示这是一个GET请求
@POST 表示这个一个POST请求
@PUT 表示这是一个PUT请求
@DELETE 表示这是一个DELETE请求
@HEAD 表示这是一个HEAD请求
@OPTIONS 表示这是一个OPTION请求
@PATCH 表示这是一个PAT请求

各种请求注解的意思

格式 含义
@Headers 添加请求头
@Path 替换路径
@Query 替代参数值,通常是结合get请求的
@FormUrlEncoded 用表单数据提交
@Field 替换参数值,是结合post请求的

Retrofit的简单使用例子

要使用retrofit请求网络数据,大概可以分为以下几步

  • 1)添加依赖,这里以AndroidStudio为例:在build.grale添加如下依赖
1
2
 compile 'com.squareup.retrofit2:retrofit:2.1.0'
compile 'com.squareup.retrofit2:converter-gson:2.1.0'
  • 2) 创建Retrofit对象
1
2
3
4
5
6
7
Retrofit retrofit = new Retrofit.Builder()
//使用自定义的mGsonConverterFactory
.addConverterFactory(GsonConverterFactory.create())
.baseUrl("http://apis.baidu.com/txapi/")
.build();
mApi = retrofit.create(APi.class);

  • 3)发起网络请求
1
2
3
4
5
6
7
8
9
10
11
12
13
14
15
mApi = retrofit.create(APi.class);
Call<News> news = mApi.getNews("1", "10");
news.enqueue(new Callback<News>() {
@Override
public void onResponse(Call<News> call, Response<News> response) {

}

@Override
public void onFailure(Call<News> call, Throwable t) {

}
});


1
2
3
4
5
6
7
public interface APi {

@Headers("apikey:81bf9da930c7f9825a3c3383f1d8d766")
@GET("word/word")
Call<News> getNews(@Query("num") String num,@Query("page")String page);
}

到此一个简单的使用retrofit的网络请求就完成了。接下来我们来了解retrofit的各种请求方式。


Retrofit的get请求

加入我们想请求这样的网址:http://apis.baidu.com/txapi/world/world?num=10&page=1,header为"apikey:81bf9da930c7f9825a3c3383f1d8d766",我们可以这样请求:

第一步,在interface Api中 增加如下方法

1
2
3
4
5

@Headers("apikey:81bf9da930c7f9825a3c3383f1d8d766")
@GET("word/word")
Call<News> getNews(@Query("num") String num,@Query("page")String page);

第二部,在代码里面请求

1
2
3
4
5
6
7
8
9
10
11
12
13
14
15
16
17
18
19
20
21
22
23
24
25
26
//创建retrofit对象
Retrofit retrofit = new Retrofit.Builder()
//使用自定义的mGsonConverterFactory
.addConverterFactory(GsonConverterFactory.create())
.baseUrl("http://apis.baidu.com/txapi/")
.build();
// 实例化我们的mApi对象
mApi = retrofit.create(APi.class);

// 调用我们的响应的方法
Call<News> news = mApi.getNews(number, page);
news.enqueue(new Callback<News>() {
@Override
public void onResponse(Call<News> call, Response<News> response) {
News body = response.body();
Logger.i("onResponse: ="+body.toString());
}

@Override
public void onFailure(Call<News> call, Throwable t) {
Logger.i("onResponse: ="+t.getMessage());

}
});


解释说明

假设BaseUrl是http://apis.baidu.com/txapi/的前提下

1
2
3
@Headers("apikey:81bf9da930c7f9825a3c3383f1d8d766")
@GET("word/word")
Call<News> getNews(@Query("num") String num,@Query("page")String page,@Query("type") String type);
  • 5)加入我们想要请求这样的网址http://apis.baidu.com/txapi/tiyu/tiyu?num=10&page=1,,我们可以这样写

    1
    2
    3
    4
    5
     @Headers({"apikey:81bf9da930c7f9825a3c3383f1d8d766" ,"Content-Type:application/json"})
    @GET("{type}/{type}")
    Call<News> tiYu(@Path("type") String type, @Query("num") String num,@Query("page")String page);
    String type="tiyu";
    Call<News> news = api.tiYu(type,number, page);

retrofit的post请求

假如我们想要 请求这样的网址http://apis.baidu.com/txapi/world/world?以post的 方式提交这样的 数据:num=10&page=1,我们可以写成 如下的 样子,注意post的时候必须使用@Field这种形式的注解,而不是使用@Query这种形式的注解,其他的 与get请求一样,这样只给出核心代码

1
2
3
4
5
6
@FormUrlEncoded
@Headers({"apikey:81bf9da930c7f9825a3c3383f1d8d766" ,"Content-Type:application/json"})
@POST("world/world")
Call<News> postNews(@Field("num") String num, @Field("page")String page);


如何为retrofit添加请求头head

总共有以下几种方式

第一种方法

在OKHttpClient interceptors里面进行处理,这样添加的headKey不会覆盖掉 前面的 headKey

1
2
3
4
5
6
7
8
9
10
11
12
13
14
okHttpClient.interceptors().add(new Interceptor() {  
@Override
public Response intercept(Interceptor.Chain chain) throws IOException {
Request original = chain.request();

// Request customization: add request headers
Request.Builder requestBuilder = original.newBuilder()
.addHeader("header-key", "value1")
.addHeader("header-key", "value2");

Request request = requestBuilder.build();
return chain.proceed(request);
}
});

第二种方法

同样在在OKHttpClient interceptors里面进行处理,这样添加的headKey会覆盖掉 前面的 headKey

1
2
3
4
5
6
7
8
9
10
11
12
13
okHttpClient.interceptors().add(new Interceptor() {  
@Override
public Response intercept(Interceptor.Chain chain) throws IOException {
Request original = chain.request();

// Request customization: add request headers
Request.Builder requestBuilder = original.newBuilder()
.header("headerkey", "header-value"); // <-- this is the important line

Request request = requestBuilder.build();
return chain.proceed(request);
}
});

第三种方法

利用 retrofit自带的注解,比如我们想要添加这样的请求头:”apikey:81bf9da930c7f9825a3c3383f1d8d766” ,”Content-Type:application/json”;则可以写成如下的 样式

1
2
3
4
5
@Headers({"apikey:81bf9da930c7f9825a3c3383f1d8d766" ,"Content-Type:application/json"})
@GET("world/world")
Call<News> getNews(@Query("num") String num,@Query("page")String page);


通过post提交json数据

Post 提交JSON数据

有时提交的数据量比较大时,用键值对的方式提交参数不太方便,Retrofit可以通过@Body注释,直接传递一个对象给请求主体,Retrofit通过JSON转化器,把对象映射成JSON数据。

假设我们需要提交的数据为

1
2
3
4
{
"id": 1,
"text": "my task title"
}
  • 接口定义:
1
2
3
4
5
public interface TaskService {  
@Headers({"Content-Type: application/json","Accept: application/json"})
@POST("/tasks")
Call<Task> createTask(@Body Task task);
}
  • 传递实体需要有Model:
1
2
3
4
5
6
7
8
9
10
public class Task {  
private long id;
private String text;

public Task() {}
public Task(long id, String text) {
this.id = id;
this.text = text;
}
}
  • 客户端调用:
1
2
3
Task task = new Task(1, "my task title");  
Call<Task> call = taskService.createTask(task);
call.enqueue(new Callback<Task>() {});
  • 这样,服务端得到的是JOSN数据:
1
2
3
4
{
"id": 1,
"text": "my task title"
}

到此,这篇博客为止

题外话:

其实retrofit在5月份实习的时候就接触了,之前为什么不写 博客了,因为网上的 使用教程很多,觉得没有必要。到后面学习的时候,发现retrofit的使用时 比较灵活的,并且使用方法也是相对较多的,于是,就写了retrofit这系列的使用博客。

转载请注明博客地址:http://blog.csdn.net/gdutxiaoxu/article/details/52745491

源码下载地址:https://github.com/gdutxiaoxu/RetrofitDemo.git

参考官网地址http://square.github.io/retrofit/


常用的自定义View例子一( FlowLayout)

在Android开发中,我们经常会遇到流布式的布局,经常会用来一些标签的显示,比如qq中个人便签,搜索框下方提示的词语,这些是指都是流布式的布局,今天我就我们日常开放中遇到的流布式布局坐一些总结

转载请注明博客地址:http://blog.csdn.net/gdutxiaoxu/article/details/51765428

**源码下载地址:https://github.com/gdutxiaoxu/CustomViewDemo.git **

效果图

1. 先给大家看一下效果

  • 图一


  • 图二


仔细观察,我们可以知道图二其实是图一效果的升级版,图一当我们控件的宽度超过这一行的时候,剩余的宽度它不会自动分布到每个控件中,而图二的效果当我们换行的时候,如控件还没有占满这一行的时候,它会自动把剩余的宽度分布到每个控件中

2.废话不多说了,大家来直接看来看一下图一的源码

1)代码如下

1
2
3
4
5
6
7
8
9
10
11
12
13
14
15
16
17
18
19
20
21
22
23
24
25
26
27
28
29
30
31
32
33
34
35
36
37
38
39
40
41
42
43
44
45
46
47
48
49
50
51
52
53
54
55
56
57
58
59
60
61
62
63
64
65
66
67
68
69
70
71
72
73
74
75
76
77
78
79
80
81
82
83
84
85
86
87
88
89
90
91
92
93
94
95
96
97
98
99
100
101
102
103
104
105
106
107
108
109
110
111
112
113
114
115
116
117
118
119
120
121
122
123
124
125
126
127
128
129
130
131
132
133
134
135
136
137
138
139
140
141
142
143
144
145
146
147
148
149
150
151
152
153
154
155
156
157
/**
* 博客地址:http://blog.csdn.net/gdutxiaoxu
* @author xujun
* @time 2016/6/20 23:49.
*/
public class SimpleFlowLayout extends ViewGroup {
private int verticalSpacing = 20;

public SimpleFlowLayout(Context context ) {
super(context);
}

/**
* 重写onMeasure方法是为了确定最终的大小
* @param widthMeasureSpec
* @param heightMeasureSpec
*/
@Override
protected void onMeasure(int widthMeasureSpec, int heightMeasureSpec) {
int widthSpecMode = MeasureSpec.getMode(widthMeasureSpec);
int widthSpecSize = MeasureSpec.getSize(widthMeasureSpec);
int heightSpecMode = MeasureSpec.getMode(heightMeasureSpec);
int heightSpecSize = MeasureSpec.getSize(heightMeasureSpec);

int paddingLeft = getPaddingLeft();
int paddingRight = getPaddingRight();
int paddingTop = getPaddingTop();
int paddingBottom = getPaddingBottom();
//处理Padding属性,让当前的ViewGroup支持Padding
int widthUsed = paddingLeft + paddingRight;
int heightUsed = paddingTop + paddingBottom;

int childMaxHeightOfThisLine = 0;
int childCount = getChildCount();
for (int i = 0; i < childCount; i++) {
View child = getChildAt(i);
if (child.getVisibility() != GONE) {
// 已用的宽度
int childUsedWidth = 0;
// 已用的高度
int childUsedHeight = 0;
// 调用ViewGroup自身的方法测量孩子的宽度和高度,我们也可以自己根据MeasureMode来测量
measureChild(child,widthMeasureSpec,heightMeasureSpec);
childUsedWidth += child.getMeasuredWidth();
childUsedHeight += child.getMeasuredHeight();
//处理Margin,支持孩子的Margin属性
Rect marginRect = getMarginRect(child);
int leftMargin=marginRect.left;
int rightMargin=marginRect.right;
int topMargin=marginRect.top;
int bottomMargin=marginRect.bottom;

childUsedWidth += leftMargin + rightMargin;
childUsedHeight += topMargin + bottomMargin;
//总宽度没有超过本行
if (widthUsed + childUsedWidth < widthSpecSize) {
widthUsed += childUsedWidth;
if (childUsedHeight > childMaxHeightOfThisLine) {
childMaxHeightOfThisLine = childUsedHeight;
}
} else {//总宽度已经超过本行
heightUsed += childMaxHeightOfThisLine + verticalSpacing;
widthUsed = paddingLeft + paddingRight + childUsedWidth;
childMaxHeightOfThisLine = childUsedHeight;
}

}

}
//加上最后一行的最大高度
heightUsed += childMaxHeightOfThisLine;
setMeasuredDimension(widthSpecSize, heightUsed);
}


@Override
protected void onLayout(boolean changed, int l, int t, int r, int b) {
int paddingLeft = getPaddingLeft();
int paddingRight = getPaddingRight();
int paddingTop = getPaddingTop();
int paddingBottom = getPaddingBottom();

/**
* 为了 支持Padding属性
*/
int childStartLayoutX = paddingLeft;
int childStartLayoutY = paddingTop;

int widthUsed = paddingLeft + paddingRight;

int childMaxHeight = 0;

int childCount = getChildCount();
//摆放每一个孩子的高度
for (int i = 0; i < childCount; i++) {
View child = getChildAt(i);
if (child.getVisibility() != GONE) {
int childNeededWidth, childNeedHeight;
int left, top, right, bottom;

int childMeasuredWidth = child.getMeasuredWidth();
int childMeasuredHeight = child.getMeasuredHeight();

Rect marginRect = getMarginRect(child);
int leftMargin=marginRect.left;
int rightMargin=marginRect.right;
int topMargin=marginRect.top;
int bottomMargin=marginRect.bottom;
childNeededWidth = leftMargin + rightMargin + childMeasuredWidth;
childNeedHeight = topMargin + topMargin + childMeasuredHeight;

// 没有超过本行
if (widthUsed + childNeededWidth <= r - l) {
if (childNeedHeight > childMaxHeight) {
childMaxHeight = childNeedHeight;
}
left = childStartLayoutX + leftMargin;
top = childStartLayoutY + topMargin;
right = left + childMeasuredWidth;
bottom = top + childMeasuredHeight;
widthUsed += childNeededWidth;
childStartLayoutX += childNeededWidth;
} else {
childStartLayoutY += childMaxHeight + verticalSpacing;
childStartLayoutX = paddingLeft;
widthUsed = paddingLeft + paddingRight;
left = childStartLayoutX + leftMargin;
top = childStartLayoutY + topMargin;
right = left + childMeasuredWidth;
bottom = top + childMeasuredHeight;
widthUsed += childNeededWidth;
childStartLayoutX += childNeededWidth;
childMaxHeight = childNeedHeight;
}
child.layout(left, top, right, bottom);
}
}
}

private Rect getMarginRect(View child) {
LayoutParams layoutParams = child.getLayoutParams();
int leftMargin = 0;
int rightMargin = 0;
int topMargin = 0;
int bottomMargin = 0;
if (layoutParams instanceof MarginLayoutParams) {
MarginLayoutParams marginLayoutParams = (MarginLayoutParams) layoutParams;
leftMargin = marginLayoutParams.leftMargin;
rightMargin = marginLayoutParams.rightMargin;
topMargin = marginLayoutParams.topMargin;
bottomMargin = marginLayoutParams.bottomMargin;

}
return new Rect(leftMargin, topMargin, rightMargin, bottomMargin);
}

}

2)思路解析

  1. 首先我们重写onMeasure方法,在OnMeasure方法里面我们调用measureChild()这个方法去获取每个孩子的宽度和高度,每次增加一个孩子我们执行 widthUsed += childUsedWidth;

  2. 添加完一个孩子以后我们判断widthUsed是够超出控件本身的最大宽度widthSpecSize,
    若没有超过执行

        widthUsed += childUsedWidth;
        if (childUsedHeight > childMaxHeightOfThisLine) {
         childMaxHeightOfThisLine = childUsedHeight;
         }
    

超过控件的宽度执行

        heightUsed += childMaxHeightOfThisLine + verticalSpacing;
        widthUsed = paddingLeft + paddingRight + childUsedWidth;
        childMaxHeightOfThisLine = childUsedHeight;  

最后调用 setMeasuredDimension(widthSpecSize, heightUsed);这个方法去设置它的大小
3.在OnLayout方法里面,所做的工作就是去摆放每一个孩子的位置 ,判断需不需要换行,不需要更改left值,需要换行,更改top值

3)注意事项

讲解之前,我们先来了解一下一个基本知识

从这张图片里面我们可以得出这样结论

  1. Width=控件真正的宽度(realWidth)+PaddingLeft+PaddingRight
  2. margin是子控件相对于父控件的距离

注意事项

  1. 为了支持控件本身的padding属性,我们做了处理,主要代码如下
    1
    2
    3
    4
    5
    6
    7
    8
    9
    int widthUsed = paddingLeft + paddingRight;
    int heightUsed = paddingTop + paddingBottom;
    ----------
    if (widthUsed + childUsedWidth < widthSpecSize) {
    widthUsed += childUsedWidth;
    if (childUsedHeight > childMaxHeightOfThisLine) {
    childMaxHeightOfThisLine = childUsedHeight;
    }
    }
  2. 为了支持子控件的margin属性,我们同样也做了处理
    1
    2
    3
    4
    5
    6
    7
    8
    Rect marginRect = getMarginRect(child);
    int leftMargin=marginRect.left;
    int rightMargin=marginRect.right;
    int topMargin=marginRect.top;
    int bottomMargin=marginRect.bottom;

    childUsedWidth += leftMargin + rightMargin;
    childUsedHeight += topMargin + bottomMargin;

即我们在计算孩子所占用的宽度和高度的时候加上margin属性的高度,接着在计算需要孩子总共用的宽高度的时候加上每个孩子的margin属性的宽高度,这样自然就支持了孩子的margin属性了

4.缺陷

如下图所见,在控件宽度参差不齐的情况下,控件换行会留下一些剩余的宽度,作为想写出鲁棒性的代码的我们会觉得别扭,于是我们相处了解决办法。

解决方法见下面

图二源码解析

废话不多说,先看源码

1
2
3
4
5
6
7
8
9
10
11
12
13
14
15
16
17
18
19
20
21
22
23
24
25
26
27
28
29
30
31
32
33
34
35
36
37
38
39
40
41
42
43
44
45
46
47
48
49
50
51
52
53
54
55
56
57
58
59
60
61
62
63
64
65
66
67
68
69
70
71
72
73
74
75
76
77
78
79
80
81
82
83
84
85
86
87
88
89
90
91
92
93
94
95
96
97
98
99
100
101
102
103
104
105
106
107
108
109
110
111
112
113
114
115
116
117
118
119
120
121
122
123
124
125
126
127
128
129
130
131
132
133
134
135
136
137
138
139
140
141
142
143
144
145
146
147
148
149
150
151
152
153
154
155
156
157
158
159
160
161
162
163
164
165
166
167
168
169
170
171
172
173
174
175
176
177
178
179
180
181
182
183
184
185
186
187
188
189
190
191
192
193
194
195
196
197
198
199
200
201
202
203
204
205
206
207
208
209
210
211
212
213
214
215
216
217
218
219
220
221
222
223
224
225
226
227
228
229
230
231
232
233
/**
* 博客地址:http://blog.csdn.net/gdutxiaoxu
* @author xujun
* @time 2016/6/26 22:54.
*/
public class PrefectFlowLayout extends ViewGroup {


public PrefectFlowLayout(Context context) {
super(context);
}

public PrefectFlowLayout(Context context, AttributeSet attrs) {
super(context, attrs);
}

public PrefectFlowLayout(Context context, AttributeSet attrs, int defStyleAttr) {
super(context, attrs, defStyleAttr);
}
//父容器宽度
private int parentWidthSize;
//水平间距
private int horizontalSpacing = 16;
//垂直间距
private int verticalSpacing = 16;
//当前行
private Line currentLine;
//所有行的集合
private List<Line> mLines = new ArrayList<>();
//当前行已使用宽度
private int userWidth = 0;

/**
* 行对象
*/
private class Line {
//一行里面所添加的子View集合
private List<View> children;
//当前行高度
private int height;
//当前行已使用宽度
private int lineWidth = 0;

public Line() {
children = new ArrayList<>();
}

/**
* 添加一个子控件
*
* @param child
*/
private void addChild(View child) {
children.add(child);
if (child.getMeasuredHeight() > height) {
//当前行高度以子控件最大高度为准
height = child.getMeasuredHeight();
}
//将每个子控件宽度进行累加,记录使用的宽度
lineWidth += child.getMeasuredWidth();
}

/**
* 获取行的高度
*
* @return
*/
public int getHeight() {
return height;
}

/**
* 获取子控件的数量
*
* @return
*/
public int getChildCount() {
return children.size();
}

/**
* 放置每一行里面的子控件的位置
*
* @param l 距离最左边的距离
* @param t 距离最顶端的距离
*/
public void onLayout(int l, int t) {
//当前行使用的宽度,等于每个子控件宽度之和+子控件之间的水平距离
lineWidth += horizontalSpacing * (children.size() - 1);
int surplusChild = 0;
int surplus = parentWidthSize - lineWidth;//剩余宽度
if (surplus > 0) {
//如果有剩余宽度,则将剩余宽度平分给每一个子控件
surplusChild = (int) (surplus / children.size()+0.5);
}
for (int i = 0; i < children.size(); i++) {
View child = children.get(i);
child.getLayoutParams().width=child.getMeasuredWidth()+surplusChild;
if (surplusChild>0){
//如果长度改变了后,需要重新测量,否则布局中的属性大小还会是原来的大小
child.measure(MeasureSpec.makeMeasureSpec(
child.getMeasuredWidth()+surplusChild,MeasureSpec.EXACTLY)
,MeasureSpec.makeMeasureSpec(height,MeasureSpec.EXACTLY));
}
child.layout(l, t, l + child.getMeasuredWidth(), t + child.getMeasuredHeight());
l += child.getMeasuredWidth() + horizontalSpacing;
}
}
}
// getMeasuredWidth() 控件实际的大小
// getWidth() 控件显示的大小

@Override
protected void onMeasure(int widthMeasureSpec, int heightMeasureSpec) {
//将之前测量的数据进行清空,以防复用时影响下次测量
mLines.clear();
currentLine = null;
userWidth = 0;
//获取父容器的宽度和模式
int widthMode = MeasureSpec.getMode(widthMeasureSpec);
parentWidthSize = MeasureSpec.getSize(widthMeasureSpec)
- getPaddingLeft() - getPaddingRight();
//获取父容器的高度和模式
int heigthMode = MeasureSpec.getMode(heightMeasureSpec);
int heightSize = MeasureSpec.getSize(heightMeasureSpec)
- getPaddingTop() - getPaddingBottom();
int childWidthMode, childHeightMode;
//为了测量每个子控件,需要指定每个子控件的测量规则
//子控件设置为WRAP_CONTENT,具体测量规则详见,ViewGroup的getChildMeasureSpec()方法
if (widthMode == MeasureSpec.EXACTLY) {
childWidthMode = MeasureSpec.AT_MOST;
} else {
childWidthMode = widthMode;
}
if (heigthMode == MeasureSpec.EXACTLY) {
childHeightMode = MeasureSpec.AT_MOST;
} else {
childHeightMode = heigthMode;
}
//获取到子控件高和宽的测量规则
int childWidthMeasureSpec = MeasureSpec.makeMeasureSpec(parentWidthSize, childWidthMode);
int childHeightMeasureSpec = MeasureSpec.makeMeasureSpec(heightSize, childHeightMode);
currentLine = new Line();//创建第一行
for (int i = 0; i < getChildCount(); i++) {
View child = getChildAt(i);
//测量每一个孩子
child.measure(childWidthMeasureSpec, childHeightMeasureSpec);
//获取当前子控件的实际宽度
int childMeasuredWidth = child.getMeasuredWidth();
//让当前行使用宽度加上当前子控件宽度
userWidth += childMeasuredWidth;
if (userWidth <= parentWidthSize) {
//如果当前行使用宽度小于父控件的宽度,则加入该行
currentLine.addChild(child);
//当前行使用宽度加上子控件之间的水平距离
userWidth += horizontalSpacing;
//如果当前行加上水平距离后超出父控件宽度,则换行
if (userWidth > parentWidthSize) {
newLine();
}
} else {
//以防出现一个子控件宽度超过父控件的情况出现
if (currentLine.getChildCount() == 0) {
currentLine.addChild(child);
}
newLine();
//并将超出范围的当前的子控件加入新的行中
currentLine.addChild(child);
//并将使用宽度加上子控件的宽度;
userWidth = child.getMeasuredWidth()+horizontalSpacing;
}
}
//加入最后一行,因为如果最后一行宽度不足父控件宽度时,就未换行
if (!mLines.contains(currentLine)) {
mLines.add(currentLine);
}
int totalHeight = 0;//总高度
for (Line line : mLines) {
//总高度等于每一行的高度+垂直间距
totalHeight += line.getHeight() + verticalSpacing;
}
//resolveSize(),将实际高度与父控件高度进行比较,选取最合适的
setMeasuredDimension(parentWidthSize + getPaddingLeft() + getPaddingRight(),
resolveSize(totalHeight + getPaddingTop() + getPaddingBottom(), heightMeasureSpec));
}

/**
* 换行
*/
private void newLine() {
mLines.add(currentLine);//记录之前行
currentLine = new Line();//重新创建新的行
userWidth = 0;//将使用宽度初始化
}

/**
* 放置每个子控件的位置
*
* @param changed
* @param l
* @param t
* @param r
* @param b
*/
@Override
protected void onLayout(boolean changed, int l, int t, int r, int b) {
l += getPaddingLeft();
t += getPaddingTop();
for (int i = 0; i < mLines.size(); i++) {
Line line = mLines.get(i);
//设置每一行的位置,每一行的子控件由其自己去分配
line.onLayout(l, t);
//距离最顶端的距离,即每一行高度和垂直间距的累加
t += line.getHeight() + verticalSpacing;
}
}

/**
* 获取子控件的测量规则
*
* @param mode 父控件的测量规则
* @return 子控件设置为WRAP_CONTENT,具体测量规则详见,ViewGroup的getChildMeasureSpec()方法
*/
private int getMode(int mode) {
int childMode = 0;
if (mode == MeasureSpec.EXACTLY) {
childMode = MeasureSpec.AT_MOST;
} else {
childMode = mode;
}
return childMode;
}
}

2.思路解析

  1. 对比图一的实现思路,我们封装了Line这个内部类,看到这个名字,相信大家都猜到是什么意思了,其实就是一个Line实例对象代表一行,Line里面的List children用来存放孩子

     private List<View> children;//一行里面所添加的子View集合
    
  2. Line里面还封装了void onLayout(int l, int t)方法,即自己去拜访每个孩子的位置,
    实现剩余的宽度平均分配,主要体现在这几行代码

    1
    2
    3
    4
    5
    6
    7
    8
    9
    10
     if (surplus > 0) {
    //如果有剩余宽度,则将剩余宽度平分给每一个子控件
    surplusChild = (int) (surplus / children.size()+0.5);
    }
    -------
    //重新分配每个孩子的大小

    child.measure(MeasureSpec.makeMeasureSpec(
    child.getMeasuredWidth()+surplusChild,MeasureSpec.EXACTLY)
    ,MeasureSpec.makeMeasureSpec(height,MeasureSpec.EXACTLY));

今天就写到这里了,有时间再来补充,最近考试比较忙,已经好久没有更新博客了。

源码下载地址:https://github.com/gdutxiaoxu/CustomViewDemo.git

360面试心得(Android)


这次360面试,总共面试了两轮,都是视频面试。

时间:2016-08-23

转载请注明原博客地址:

闲谈:

从大二暑假的时候开始,一直想进腾讯或者阿里,在招实习生的时候,最终遗憾落选。暑假的时候为了好好准备校招,我放弃了去步步高实习的机会,继续在原来的一家公司实习。在暑假的时候找师兄师姐内推了腾讯,阿里,最终都没有通过简历筛选,没有面试。说实话,刚开始内心是挺失落的,挺难受的,但经过一两天的调整,我也意识到自己的错误,以前那种强烈想进bat的欲望渐渐淡了下来,当然并不是说不想进bat,只是不再那么注重结果,更注重这奋斗过程中个人的成长。

360一面

差不多三十五分钟

  • 介绍你做过的项目
  • 手写单例模式
  • 布局优化
  • 有没有用过什么开源框架?
  • ImagLoader的实现原理
  • OnTouchEvent事件中 down事件 和up事件的传递
  • hashMap的实现 原理
  • LinkedHashMap的实现原理
  • 内存管理及优化
  • 点九图

点九图

https://isux.tencent.com/android-ui-9-png.html

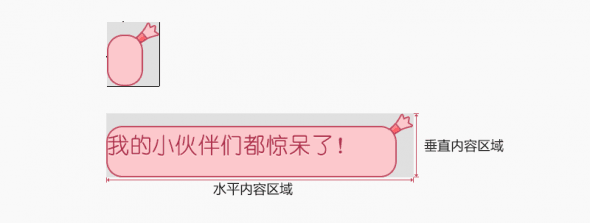
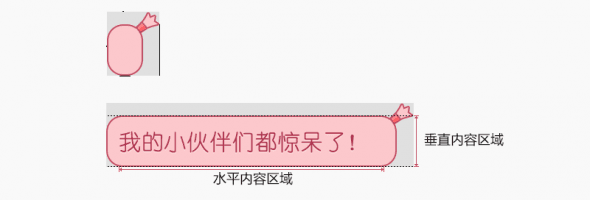
放大后可以比较明显的看到上下左右分别有一个像素的黑色线段,这里分别标注了序号。简单来说,

序号1和2标识了可以拉伸的区域,

序号3和4标识了内容区域。当设定了按钮实际应用的宽和高之后,横向会拉伸1区域的像素,纵向会拉伸2区域的像素。如下图:

这里程序设置的文字垂直居中,水平居左的对齐方式。对齐方式是没有问题的,但是对于这种大圆角同时又有些不规则边框的的图形来说,错误的标注方式会让排版看起来很混乱。所以我们需要修正内容区域的线段位置和长度。

有两点需要特别注意下:

1.最外围的一圈像素必须要么是纯黑色,要么是透明,一点点的半透明的像素都不可以有,比如说99%的黑色或者是1%的投影都不可以有;

2.文件的后缀名必须是.9.png,不能是.png或者是.9.png.png,这样的命名都会导致编译失败。

内存管理及优化

我这里答的是内存泄漏和oom
少用static静态变量

  1. 珍惜Services资源

我们知道service所在的Activity级别相对后台Activity的级别是比较 高的,一般不易被回收。
在service不再使用的时候,及时退出。最好的方法是使用IntentService

2)在UI不可见的时候释放资源

当用户切换到其它应用并且你的应用 UI不再可见时,你应该释放你的应用UI上所占用的所有内存资源。在这个时候释放UI资源可以显著的增加系统缓存进程的能力,它会对用户体验有着很直接的影响。

为了能够接收到用户离开你的UI时的通知,你需要实现Activtiy类里面的onTrimMemory()回调方法。你应该使用这个方法来监听到TRIM_MEMORY_UI_HIDDEN级别的回调,此时意味着你的UI已经隐藏,你应该释放那些仅仅被你的UI使用的资源。

请注意:你的应用仅仅会在所有UI组件的被隐藏的时候接收到onTrimMemory()的回调并带有参数TRIM_MEMORY_UI_HIDDEN。这与onStop()的回调是不同的,onStop会在activity的实例隐藏时会执行,例如当用户从你的app的某个activity跳转到另外一个activity时前面activity的onStop()会被执行。因此你应该实现onStop回调,并且在此回调里面释放activity的资源,例如释放网络连接,注销监听广播接收者。除非接收到onTrimMemory(TRIM_MEMORY_UI_HIDDEN))的回调,否者你不应该释放你的UI资源。这确保了用户从其他activity切回来时,你的UI资源仍然可用,并且可以迅速恢复activity。

  1. 当内存紧张时释放部分内存

关于onTrimMemory的介绍

在你的app生命周期的任何阶段,onTrimMemory的回调方法同样可以告诉你整个设备的内存资源已经开始紧张。你应该根据onTrimMemory回调中的内存级别来进一步决定释放哪些资源。

TRIM_MEMORY_RUNNING_MODERATE:你的app正在运行并且不会被列为可杀死的。但是设备此时正运行于低内存状态下,系统开始触发杀死LRU Cache中的Process的机制。
TRIM_MEMORY_RUNNING_LOW:你的app正在运行且没有被列为可杀死的。但是设备正运行于更低内存的状态下,你应该释放不用的资源用来提升系统性能(但是这也会直接影响到你的app的性能)。
TRIM_MEMORY_RUNNING_CRITICAL:你的app仍在运行,但是系统已经把LRU Cache中的大多数进程都已经杀死,因此你应该立即释放所有非必须的资源。如果系统不能回收到足够的RAM数量,系统将会清除所有的LRU缓存中的进程,并且开始杀死那些之前被认为不应该杀死的进程,例如那个包含了一个运行态Service的进程。
同样,当你的app进程正在被cached时,你可能会接受到从onTrimMemory()中返回的下面的值之一:

TRIM_MEMORY_BACKGROUND: 系统正运行于低内存状态并且你的进程正处于LRU缓存名单中最不容易杀掉的位置。尽管你的app进程并不是处于被杀掉的高危险状态,系统可能已经开始杀掉LRU缓存中的其他进程了。你应该释放那些容易恢复的资源,以便于你的进程可以保留下来,这样当用户回退到你的app的时候才能够迅速恢复。
TRIM_MEMORY_MODERATE: 系统正运行于低内存状态并且你的进程已经已经接近LRU名单的中部位置。如果系统开始变得更加内存紧张,你的进程是有可能被杀死的。
TRIM_MEMORY_COMPLETE: 系统正运行与低内存的状态并且你的进程正处于LRU名单中最容易被杀掉的位置。你应该释放任何不影响你的app恢复状态的资源。
因为onTrimMemory()的回调是在API 14才被加进来的,对于老的版本,你可以使用onLowMemory)回调来进行兼容。onLowMemory相当与TRIM_MEMORY_COMPLETE。

Note: 当系统开始清除LRU缓存中的进程时,尽管它首先按照LRU的顺序来操作,但是它同样会考虑进程的内存使用量。因此消耗越少的进程则越容易被留下来。

  1. 避免bitmaps的浪费

当你加载一个bitmap时,仅仅需要保留适配当前屏幕设备分辨率的数据即可,如果原图高于你的设备分辨率,需要做缩小的动作。请记住,增加bitmap的尺寸会对内存呈现出2次方的增加,因为X与Y都在增加。

Note:在Android 2.3.x (API level 10)及其以下, bitmap对象的pixel data是存放在native内存中的,它不便于调试。然而,从Android 3.0(API level 11)开始,bitmap pixel data是分配在你的app的Dalvik heap中, 这提升了GC的工作效率并且更加容易Debug。因此如果你的app使用bitmap并在旧的机器上引发了一些内存问题,切换到3.0以上的机器上进行Debug。

  1. 使用优化的数据容器

利用Android Framework里面优化过的容器类,例如SparseArray, SparseBooleanArray, 与 LongSparseArray。 通常的HashMap的实现方式更加消耗内存,因为它需要一个额外的实例对象来记录Mapping操作。另外,SparseArray更加高效在于他们避免了对key与value的autobox自动装箱,并且避免了装箱后的解箱。

  1. 请注意内存开销

对你所使用的语言与库的成本与开销有所了解,从开始到结束,在设计你的app时谨记这些信息。通常,表面上看起来无关痛痒(innocuous)的事情也许实际上会导致大量的开销。例如:

Enums的内存消耗通常是static constants的2倍。你应该尽量避免在Android上使用enums。
在Java中的每一个类(包括匿名内部类)都会使用大概500 bytes。
每一个类的实例花销是12-16 bytes。
往HashMap添加一个entry需要额一个额外占用的32 bytes的entry对象。
7) 请注意代码“抽象”

通常,开发者使用抽象作为”好的编程实践”,因为抽象能够提升代码的灵活性与可维护性。然而,抽象会导致一个显著的开销:通常他们需要同等量的代码用于可执行。那些代码会被map到内存中。因此如果你的抽象没有显著的提升效率,应该尽量避免他们。

  1. 使用ProGuard来剔除不需要的代码

ProGuard能够通过移除不需要的代码,重命名类,域与方法等方对代码进行压缩,优化与混淆。使用ProGuard可以使得你的代码更加紧凑,这样能够使用更少mapped代码所需要的RAM。

  1. 对最终的APK使用zipalign

在编写完所有代码,并通过编译系统生成APK之后,你需要使用zipalign对APK进行重新校准。如果你不做这个步骤,会导致你的APK需要更多的RAM,因为一些类似图片资源的东西不能被mapped。

Notes: Google Play不接受没有经过zipalign的APK。

360二面

一面过了十多分钟以后,接着就进行二面,都是视频面试,差不多二十分钟左右

  • AsyncTak的原理及常用方法
  • APK从安装到启动的过程
  • 平时是怎样学习的?
  • 学习和实习是在怎样协调的 ?
  • 有360手机助手有什么想了解的吗?

对360手机助手有什么想了解的?

这里我提问的是省流量升级是怎样实现的?
后面追问是不是利用动态加载技术。面试官解释的是不是你,是对比版本之间的二进制文件差异。

面试总结

题外话

两轮面试面试官人都挺好的,都面带笑容个,感觉很好说话,当天晚上我加了面试官的微信,问他多久会出结果,面试官问我说后面有没有接到电话,我说没有,然后面试官说应该被刷了。

个人心得

可能是第一次视频面试,感觉个人太紧张了,有好多原理性的东西讲着讲着就忘记讲了,面试的时候真的是太紧张了,发挥不太好,平时一定要多总结,不然面试的时候一下子总结地不太好,发挥不出应有的水平。

转载请注明原博客地址:

使用CoordinatorLayout打造各种炫酷的效果

自定义Behavior —— 仿知乎,FloatActionButton隐藏与展示

前段时间写了一篇博客使用CoordinatorLayout打造各种炫酷的效果,主要介绍了APPBarLayout和CollapsingToolbarLayout的基本用法,AppBarLayout主要用来实现在滚动的时候ToolBar的 隐藏于展示,CollapsingToolbarLayout主要用来实现parallax和pin等效果。如果你对CoordinatorLayout还不了解的话,请先阅读这篇文章。

写作思路

  • CoordinatorLayout Behavior 简介
  • 怎样自定义 Behavior
  • 仿知乎效果 自定义 Behavior 的实现
  • 自定义 Behavior 两种方法的 对比
  • FloatActionButton 自定义 Behavior 效果的实现
  • 题外话

今天就来讲解怎样通过自定义behavior来实现各种炫酷的效果 ,效果图如下

下面让我们一起来看一下怎样实现仿知乎的效果

老规矩,先看代码

1
2
3
4
5
6
7
8
9
10
11
12
13
14
15
16
17
18
19
20
21
22
23
24
25
26
27
28
29
30
31
32
33
34
35
36
37
38
39
40
41
42
43
44
45
46
47
48
49
50
51
52
53
54
55
56
57
58
59
60
61
62
63
64
65
66
67
68
69
70
71
72
73
74
75
76
77
78
79
80
81
82
83
84
85
86
87
88
89
90
91
92
93
94
95
96
<?xml version="1.0" encoding="utf-8"?>
<android.support.design.widget.CoordinatorLayout
android:id="@+id/coordinatorLayout"
xmlns:android="http://schemas.android.com/apk/res/android"

xmlns:app="http://schemas.android.com/apk/res-auto"
xmlns:tools="http://schemas.android.com/tools"
android:layout_width="match_parent"
android:layout_height="match_parent"
>

<android.support.design.widget.AppBarLayout
android:id="@+id/index_app_bar"
theme="@style/AppTheme.AppBarOverlay"
android:layout_width="match_parent"
android:layout_height="wrap_content">


<RelativeLayout
android:layout_width="match_parent"
android:layout_height="?attr/actionBarSize"
android:background="@color/colorPrimary"
app:layout_scrollFlags="scroll|enterAlways">


<ImageView
android:id="@+id/search"
android:layout_width="24dp"
android:layout_height="24dp"
android:layout_centerVertical="true"
android:layout_marginLeft="10dp"
android:src="@drawable/search"/>

<TextView
android:layout_width="match_parent"
android:layout_height="wrap_content"
android:layout_centerVertical="true"
android:layout_marginLeft="10dp"
android:layout_toRightOf="@id/search"
android:text="搜索话题、问题或人"
android:textSize="16sp"/>

</RelativeLayout>


</android.support.design.widget.AppBarLayout>

<android.support.v7.widget.RecyclerView
android:id="@+id/recyclerView"
android:layout_width="match_parent"
android:layout_height="match_parent"
app:layout_behavior="@string/appbar_scrolling_view_behavior">

</android.support.v7.widget.RecyclerView>


<!--使用RadioGroup来实现tab的切换-->
<RadioGroup
android:id="@+id/rg"
android:layout_width="match_parent"
android:layout_height="wrap_content"
android:layout_gravity="bottom"
android:background="@color/bg_tab"
android:orientation="horizontal"
app:layout_behavior="@string/behavior_footer"
>

<RadioButton
android:id="@+id/rb_home"
style="@style/bottom_tab"
android:drawableTop="@drawable/sel_home"
android:text="Home"/>

<RadioButton
android:id="@+id/rb_course"
style="@style/bottom_tab"
android:drawableTop="@drawable/sel_course"
android:text="course"/>

<RadioButton
android:id="@+id/rb_direct_seeding"
style="@style/bottom_tab"
android:drawableTop="@drawable/sel_direct_seeding"
android:text="direct"/>

<RadioButton
android:id="@+id/rb_me"
style="@style/bottom_tab"
android:drawableTop="@drawable/sel_me"
android:text="me"/>

</RadioGroup>


</android.support.design.widget.CoordinatorLayout>

1
2
3
4
5
6
7
8
9
10
11
12
13
14
15
16
17
18
19
20
21
22
<style name="bottom_tab">
<item name="android:layout_width">0dp</item>
<item name="android:layout_height">60dp</item>
<item name="android:layout_weight">1</item>
<item name="android:text">0dp</item>
<item name="android:gravity">center</item>
<item name="android:textColor">@drawable/sel_bottom_tab_text</item>
<item name="android:padding">10dp</item>
<item name="android:button">@null</item>
</style>


思路分析

根据动态如可以看到,主要有两个效果

  • 上面的AppBarLayout 向上滑动的时候会隐藏,向下滑动的时候会展示,说白了就是给APPLayout的子View Relativelayout 设置 app:layout_scrollFlags=”scroll|enterAlways”,核心代码如下
1
2
3
4
5
6
7
8
9
10
11
12
13
14
15
16
17
18
<android.support.design.widget.AppBarLayout
android:id="@+id/index_app_bar"
theme="@style/AppTheme.AppBarOverlay"
android:layout_width="match_parent"
android:layout_height="wrap_content">


<RelativeLayout
android:layout_width="match_parent"
android:layout_height="?attr/actionBarSize"
android:background="@color/colorPrimary"
app:layout_scrollFlags="scroll|enterAlways">


----

</RelativeLayout>
</android.support.design.widget.AppBarLayout>
  • 下面的 RadioGroup ,我们可以看到,向上 滑动的时候会隐藏,向下滑动的时候会显示,其实我们只是给其设置了 behavior 而已 app:layout_behavior=”@string/behavior_footer”,那这个behavior_footer是什么东西,别急 ,下面就是介绍了
1
<string name="behavior_footer">com.xujun.contralayout.behavior.FooterBehavior</string>

Behavior简介

Behavior是CoordinatorLayout里面的一个内部类,通过它我们可以与 CoordinatorLayout的一个或者多个子View进行交互,包括 drag,swipes, flings等手势动作。

今天 我们主要着重介绍里面的几个方法

方法 解释
boolean layoutDependsOn(CoordinatorLayout parent, V child, View dependency) 确定child View 是否有一个特定的兄弟View作为布局的依赖(即dependency)
boolean onDependentViewChanged(CoordinatorLayout parent, V child, View dependency) 当child View 的 dependent view 发生变化的时候,这个方法会调用
boolean onStartNestedScroll(CoordinatorLayout coordinatorLayout, V child, View directTargetChild, View target, int nestedScrollAxes) 当CoordinatorLayout 的直接或者非直接子View开始准备嵌套滑动的时候会调用
void onNestedScroll(CoordinatorLayout coordinatorLayout, V child, View target, int dxConsumed, int dyConsumed, int dxUnconsumed, int dyUnconsumed) 当嵌套滑动的 时候,target尝试滑动或者正在滑动的 时候会调用

关于更多方法,请参考官网文档说明

怎样自定义Behavior

前面已经说到,今天主要介绍四个方法,这里我们把它分为两组。

第一组

1
2
3
4
5
// 决定child 依赖于把一个 dependency
boolean layoutDependsOn(CoordinatorLayout parent, V child, View dependency)

// 当 dependency View 改变的时候 child 要做出怎样的响应
boolean onDependentViewChanged(CoordinatorLayout parent, V child, View dependency)

第二组

1
2
3
4
5
// 当CoordinatorLayout的直接或者非直接子View开始嵌套滑动的时候,会调用这个方法
boolean onStartNestedScroll(CoordinatorLayout coordinatorLayout, V child, View directTargetChild, View target, int nestedScrollAxes)

// 当嵌套滑动的时候,target 尝试滑动或者正在滑动会调用这个方法
onNestedScroll(CoordinatorLayout coordinatorLayout, V child, View target, int dxConsumed, int dyConsumed, int dxUnconsumed, int dyUnconsumed)

首先我们先看第一组是怎样实现的?

1
2
3
4
5
6
7
8
9
10
11
12
13
14
15
16
17
18
19
20
21
22
23
24
25
26
27
28
29
30
31
/**
* 知乎效果底部behavior 依赖于 AppBarLayout
*
* @author xujun on 2016/11/30.
* @email gdutxiaoxu@163.com
*/

public class FooterBehaviorDependAppBar extends CoordinatorLayout.Behavior<View> {

public static final String TAG = "xujun";

public FooterBehaviorDependAppBar(Context context, AttributeSet attrs) {
super(context, attrs);
}

//当 dependency instanceof AppBarLayout 返回TRUE,将会调用onDependentViewChanged()方法
@Override
public boolean layoutDependsOn(CoordinatorLayout parent, View child, View dependency) {
return dependency instanceof AppBarLayout;
}

@Override
public boolean onDependentViewChanged(CoordinatorLayout parent, View child, View dependency) {
//根据dependency top值的变化改变 child 的 translationY
float translationY = Math.abs(dependency.getTop());
child.setTranslationY(translationY);
Log.i(TAG, "onDependentViewChanged: " + translationY);
return true;

}
}

思路分析

这里我们要分清两个概念,child 和 dependency ,child 是我们要改变的坐标的view,而 dependency 是child 的 附属 ,即child 会随着 dependency 坐标的改变而改变。

比如上面的例子:当我们把 app:layout_behavior=”com.xujun.contralayout.behavior.FooterBehaviorDependAppBar” 设置给 RadioGroup 的时候,这时候 child 就是 RadioGroup ,而 dependency 就是 APPBarLayout ,因为我们在 layoutDependsOn 方法里面 ,返回 dependency instanceof AppBarLayout ,即当 dependency 是 AppBarLayout 或者 AppBarLayout的子类的时候返回TRUE。

1
2
3
4
5
//当 dependency instanceof AppBarLayout 返回TRUE,将会调用onDependentViewChanged()方法
@Override
public boolean layoutDependsOn(CoordinatorLayout parent, View child, View dependency) {
return dependency instanceof AppBarLayout;
}

而之所以 RadioGroup 在向上滑动的时候会隐藏,向下滑动的时候会显示,是因为我们在 onDependentViewChanged 方法的时候 动态地根据 dependency 的 top 值改变 RadioGroup 的 translationY 值,核心 代码如下

1
2
3
4
5
6
7
8
9
@Override
public boolean onDependentViewChanged(CoordinatorLayout parent, View child, View dependency) {
//根据dependency top值的变化改变 child 的 translationY
float translationY = Math.abs(dependency.getTop());
child.setTranslationY(translationY);
Log.i(TAG, "onDependentViewChanged: " + translationY);
return true;

}

到此第一种思路分析为止

第二种思路

主要是根据 onStartNestedScroll() 和 onNestedPreScroll()方法 来实现的,

  • 当我们开始滑动的时候,我们判断是否是垂直滑动,如果是返回TRUE,否则返回 FALSE,返回TRUE,会接着调用onNestedPreScroll()等一系列方法。
1
2
3
4
5
6
//1.判断滑动的方向 我们需要垂直滑动
@Override
public boolean onStartNestedScroll(CoordinatorLayout coordinatorLayout, View child,
View directTargetChild, View target, int nestedScrollAxes) {
return (nestedScrollAxes & ViewCompat.SCROLL_AXIS_VERTICAL) != 0;
}
  • 在 onNestedPreScroll() 方法里面,我们根据我们的逻辑来决定是否显示 target , 在这里我们是向上上滑动的时候,如果我们滑动的距离超过 target 的高度 并且 当前是可见的状态下,我们执行动画,隐藏 target,当我们向下滑动的时候,并且 View 是不可见的情况下,我们执行动画 ,显示target
1
2
3
4
5
6
7
8
9
10
11
12
13
14
15
16
17
18
19
//2.根据滑动的距离显示和隐藏footer view
@Override
public void onNestedPreScroll(CoordinatorLayout coordinatorLayout, View child,
View target, int dx, int dy, int[] consumed) {
if (dy > 0 && sinceDirectionChange < 0 || dy < 0 && sinceDirectionChange > 0) {
child.animate().cancel();
sinceDirectionChange = 0;
}
sinceDirectionChange += dy;
int visibility = child.getVisibility();
if (sinceDirectionChange > child.getHeight() && visibility == View.VISIBLE) {
hide(child);
} else {
if (sinceDirectionChange < 0 && (visibility == View.GONE || visibility == View
.INVISIBLE)) {
show(child);
}
}
}

全部代码如下

1
2
3
4
5
6
7
8
9
10
11
12
13
14
15
16
17
18
19
20
21
22
23
24
25
26
27
28
29
30
31
32
33
34
35
36
37
38
39
40
41
42
43
44
45
46
47
48
49
50
51
52
53
54
55
56
57
58
59
60
61
62
63
64
65
66
67
68
69
70
71
72
73
74
75
76
77
78
79
80
81
82
83
84
85
86
87
88
89
90
91
92
93
94
95
96
97
98
99
100
/**
* 知乎效果底部 behavior
*
* @author xujun on 2016/11/30.
* @email gdutxiaoxu@163.com
*/

public class FooterBehavior extends CoordinatorLayout.Behavior<View> {

private static final Interpolator INTERPOLATOR = new FastOutSlowInInterpolator();

private int sinceDirectionChange;

public FooterBehavior(Context context, AttributeSet attrs) {
super(context, attrs);
}

//1.判断滑动的方向 我们需要垂直滑动
@Override
public boolean onStartNestedScroll(CoordinatorLayout coordinatorLayout, View child,
View directTargetChild, View target, int nestedScrollAxes) {
return (nestedScrollAxes & ViewCompat.SCROLL_AXIS_VERTICAL) != 0;
}

//2.根据滑动的距离显示和隐藏footer view
@Override
public void onNestedPreScroll(CoordinatorLayout coordinatorLayout, View child,
View target, int dx, int dy, int[] consumed) {
if (dy > 0 && sinceDirectionChange < 0 || dy < 0 && sinceDirectionChange > 0) {
child.animate().cancel();
sinceDirectionChange = 0;
}
sinceDirectionChange += dy;
int visibility = child.getVisibility();
if (sinceDirectionChange > child.getHeight() && visibility == View.VISIBLE) {
hide(child);
} else {
if (sinceDirectionChange < 0 && (visibility == View.GONE || visibility == View
.INVISIBLE)) {
show(child);
}
}
}

private void hide(final View view) {
ViewPropertyAnimator animator = view.animate().translationY(view.getHeight()).
setInterpolator(INTERPOLATOR).setDuration(200);
animator.setListener(new Animator.AnimatorListener() {
@Override
public void onAnimationStart(Animator animator) {

}

@Override
public void onAnimationEnd(Animator animator) {
view.setVisibility(View.GONE);
}

@Override
public void onAnimationCancel(Animator animator) {
show(view);
}

@Override
public void onAnimationRepeat(Animator animator) {

}
});
animator.start();
}

private void show(final View view) {
ViewPropertyAnimator animator = view.animate().translationY(0).
setInterpolator(INTERPOLATOR).
setDuration(200);
animator.setListener(new Animator.AnimatorListener() {
@Override
public void onAnimationStart(Animator animator) {

}

@Override
public void onAnimationEnd(Animator animator) {
view.setVisibility(View.VISIBLE);
}

@Override
public void onAnimationCancel(Animator animator) {
hide(view);
}

@Override
public void onAnimationRepeat(Animator animator) {

}
});
animator.start();

}
}

两种实现方法的对比和总结

  • 我们知道第一种方法我们主要是重写layoutDependsOn 和 onDependentViewChanged 这两个方法,这个方法在 layoutDependsOn 判断 dependency 是否是 APpBarLayout 的实现类,所以 会导致 child 依赖于 AppBarLayout,灵活性不是太强

  • 而第二种方法,我们主要是重写 onStartNestedScroll 和 onNestedPreScroll 这两个方法,判断是否是垂直滑动,是的话就进行处理,灵活性大大增强,推荐使用这一种方法

  • 需要注意的是不管是第一种方法,还是第二种方法,我们都需要重写带两个构造方法的函数,因为底层机制会采用反射的形式获得该对象

1
2
3
public FooterBehavior(Context context, AttributeSet attrs) {
super(context, attrs);
}

自定义 Behavior 实现 FloatingActionButton 的显示与隐藏

效果图如下

缩放隐藏的

向上向下隐藏的

布局代码

1
2
3
4
5
6
7
8
9
10
11
12
13
14
15
16
17
18
19
20
21
22
23
24
25
26
27
28
29
30
31
32
33
34
35
36
37
38
39
40
41
42
43
44
45
46
47
48
49
50
51
52
53
54
55
56
57
58
59
60
61
62
63
64
65
66
<?xml version="1.0" encoding="utf-8"?>
<android.support.design.widget.CoordinatorLayout
android:id="@+id/activity_floating_action_button"
xmlns:android="http://schemas.android.com/apk/res/android"
xmlns:tools="http://schemas.android.com/tools"
android:layout_width="match_parent"
android:layout_height="match_parent"
xmlns:app="http://schemas.android.com/apk/res-auto"
tools:context="com.xujun.contralayout.UI.FloatingActionButtonActivity">


<android.support.design.widget.AppBarLayout
android:id="@+id/index_app_bar"
theme="@style/AppTheme.AppBarOverlay"
android:layout_width="match_parent"
android:layout_height="wrap_content">


<RelativeLayout
android:layout_width="match_parent"
android:layout_height="?attr/actionBarSize"
android:background="@color/colorPrimary"
app:layout_scrollFlags="scroll|enterAlways">


<ImageView
android:id="@+id/search"
android:layout_width="24dp"
android:layout_height="24dp"
android:layout_centerVertical="true"
android:layout_marginLeft="10dp"
android:src="@drawable/search"/>

<TextView
android:layout_width="match_parent"
android:layout_height="wrap_content"
android:layout_centerVertical="true"
android:layout_marginLeft="10dp"
android:layout_toRightOf="@id/search"
android:text="搜索话题、问题或人"
android:textSize="16sp"/>

</RelativeLayout>


</android.support.design.widget.AppBarLayout>

<android.support.v7.widget.RecyclerView
android:id="@+id/recyclerView"
android:layout_width="match_parent"
android:layout_height="match_parent"
app:layout_behavior="@string/appbar_scrolling_view_behavior">

</android.support.v7.widget.RecyclerView>

<android.support.design.widget.FloatingActionButton
android:layout_width="wrap_content"
android:layout_height="wrap_content"
android:layout_gravity="bottom|right|end"
android:layout_marginBottom="40dp"
android:layout_marginRight="25dp"
android:background="@android:color/holo_green_light"
android:src="@drawable/add"
app:layout_behavior="@string/behavior_my_fab_scale"/>

</android.support.design.widget.CoordinatorLayout>

如果想使用不同的效果,只需要给 FloatingActionButton 制定不同的 bevaior 即可

1
app:layout_behavior="com.xujun.contralayout.behavior.MyFabBehavior"

自定义behavior 代码

1
2
3
4
5
6
7
8
9
10
11
12
13
14
15
16
17
18
19
20
21
22
23
24
25
26
27
28
29
30
31
32
33
34
35
36
37
38
39
40
41
42
43
44
45
46
47
48
49
50
51
52
53
54
55
56
57
58
59
60
61
62
63
64
65
66
67
68
69
70
71
72
73
74
75
76
77
78
79
80
81
82
83
84
85
86
87
88
89
90
91
92
93
94
95
96
/**
* FloatingActionButton behavior 向上向下隐藏的
* @author xujun on 2016/12/1.
* @email gdutxiaoxu@163.com
*/

public class MyFabBehavior extends CoordinatorLayout.Behavior<View> {

private static final Interpolator INTERPOLATOR = new FastOutSlowInInterpolator();

private float viewY;//控件距离coordinatorLayout底部距离
private boolean isAnimate;//动画是否在进行

public MyFabBehavior(Context context, AttributeSet attrs) {
super(context, attrs);
}

//在嵌套滑动开始前回调
@Override
public boolean onStartNestedScroll(CoordinatorLayout coordinatorLayout, View child, View directTargetChild, View target, int nestedScrollAxes) {

if(child.getVisibility() == View.VISIBLE&&viewY==0){
//获取控件距离父布局(coordinatorLayout)底部距离
viewY=coordinatorLayout.getHeight()-child.getY();
}

return (nestedScrollAxes & ViewCompat.SCROLL_AXIS_VERTICAL) != 0;//判断是否竖直滚动
}

//在嵌套滑动进行时,对象消费滚动距离前回调
@Override
public void onNestedPreScroll(CoordinatorLayout coordinatorLayout, View child, View target, int dx, int dy, int[] consumed) {
//dy大于0是向上滚动 小于0是向下滚动

if (dy >=0&&!isAnimate&&child.getVisibility()==View.VISIBLE) {
hide(child);
} else if (dy <0&&!isAnimate&&child.getVisibility()==View.GONE) {
show(child);
}
}

//隐藏时的动画
private void hide(final View view) {
ViewPropertyAnimator animator = view.animate().translationY(viewY).setInterpolator(INTERPOLATOR).setDuration(200);

animator.setListener(new Animator.AnimatorListener() {
@Override
public void onAnimationStart(Animator animator) {
isAnimate=true;
}

@Override
public void onAnimationEnd(Animator animator) {
view.setVisibility(View.GONE);
isAnimate=false;
}

@Override
public void onAnimationCancel(Animator animator) {
show(view);
}

@Override
public void onAnimationRepeat(Animator animator) {
}
});
animator.start();
}

//显示时的动画
private void show(final View view) {
ViewPropertyAnimator animator = view.animate().translationY(0).setInterpolator(INTERPOLATOR).setDuration(200);
animator.setListener(new Animator.AnimatorListener() {
@Override
public void onAnimationStart(Animator animator) {
view.setVisibility(View.VISIBLE);
isAnimate=true;
}

@Override
public void onAnimationEnd(Animator animator) {
isAnimate=false;
}

@Override
public void onAnimationCancel(Animator animator) {
hide(view);
}

@Override
public void onAnimationRepeat(Animator animator) {
}
});
animator.start();
}
}
1
2
3
4
5
6
7
8
9
10
11
12
13
14
15
16
17
18
19
20
21
22
23
24
25
26
27
28
29
30
31
32
33
34
35
36
37
38
39
40
41
42
43
44
45
46
47
48
49
50
51
52
53
54
55
56
57
58
59
60
61
62
63
64
65
66
67
68
69
70
71
72
73
74
75
76
77
78
/**
* <p>下拉时显示FAB,上拉隐藏,留出更多位置给用户。</p>
* Created on 2016/12/1.
*
* @author xujun
*/
public class ScaleDownShowBehavior extends FloatingActionButton.Behavior {
/**
* 退出动画是否正在执行。
*/
private boolean isAnimatingOut = false;

private OnStateChangedListener mOnStateChangedListener;

public ScaleDownShowBehavior(Context context, AttributeSet attrs) {
super();
}

@Override
public boolean onStartNestedScroll(CoordinatorLayout coordinatorLayout, FloatingActionButton child, View directTargetChild, View target, int nestedScrollAxes) {
return nestedScrollAxes == ViewCompat.SCROLL_AXIS_VERTICAL;
}

@Override
public void onNestedScroll(CoordinatorLayout coordinatorLayout, FloatingActionButton child, View target, int dxConsumed, int dyConsumed, int dxUnconsumed, int dyUnconsumed) {
if ((dyConsumed > 0 || dyUnconsumed > 0) && !isAnimatingOut && child.getVisibility() == View.VISIBLE) {//往下滑
AnimatorUtil.scaleHide(child, viewPropertyAnimatorListener);
if (mOnStateChangedListener != null) {
mOnStateChangedListener.onChanged(false);
}
} else if ((dyConsumed < 0 || dyUnconsumed < 0) && child.getVisibility() != View.VISIBLE) {
AnimatorUtil.scaleShow(child, null);
if (mOnStateChangedListener != null) {
mOnStateChangedListener.onChanged(true);
}
}
}

public void setOnStateChangedListener(OnStateChangedListener mOnStateChangedListener) {
this.mOnStateChangedListener = mOnStateChangedListener;
}

// 外部监听显示和隐藏。
public interface OnStateChangedListener {
void onChanged(boolean isShow);
}

public static <V extends View> ScaleDownShowBehavior from(V view) {
ViewGroup.LayoutParams params = view.getLayoutParams();
if (!(params instanceof CoordinatorLayout.LayoutParams)) {
throw new IllegalArgumentException("The view is not a child of CoordinatorLayout");
}
CoordinatorLayout.Behavior behavior = ((CoordinatorLayout.LayoutParams) params).getBehavior();
if (!(behavior instanceof ScaleDownShowBehavior)) {
throw new IllegalArgumentException("The view is not associated with ScaleDownShowBehavior");
}
return (ScaleDownShowBehavior) behavior;
}

private ViewPropertyAnimatorListener viewPropertyAnimatorListener = new ViewPropertyAnimatorListener() {

@Override
public void onAnimationStart(View view) {
isAnimatingOut = true;
}

@Override
public void onAnimationEnd(View view) {
isAnimatingOut = false;
view.setVisibility(View.GONE);
}

@Override
public void onAnimationCancel(View arg0) {
isAnimatingOut = false;
}
};
}

思路这里就不详细展开了,因为前面在讲解 仿知乎效果的时候已经讲过了,大概就是根据不同的滑动行为执行不同的动画 而已


题外话

  • 通过这篇博客,熟悉 CoordinatorLayout 的 各种用法,同时也初步理解了自定义Behavior的思路
  • 同时复习了动画的相关知识
  • 如果你觉得效果还不错,欢迎到我的github上面star,github地址

文章首发地址CSDN:http://blog.csdn.net/gdutxiaoxu/article/details/53453958

源码下载地址:https://github.com/gdutxiaoxu/CoordinatorLayoutExample.git

使用CoordinatorLayout打造各种炫酷的效果

自定义Behavior —— 仿知乎,FloatActionButton隐藏与展示

NestedScrolling 机制深入解析

一步步带你读懂 CoordinatorLayout 源码

自定义 Behavior -仿新浪微博发现页的实现

ViewPager,ScrollView 嵌套ViewPager滑动冲突解决

自定义 behavior - 完美仿 QQ 浏览器首页,美团商家详情页


CoordinatorLayout简介

CoordinatorLayout是在 Google IO/15 大会发布的,遵循Material 风格,包含在 support Library中,结合AppbarLayout, CollapsingToolbarLayout等 可 产生各种炫酷的效果

CoordinatorLayout简介通常用来 干什么

Google官方地址

CoordinatorLayout is intended for two primary use cases:

As a top-level application decor or chrome layout

As a container for a specific interaction with one or more child views

简单来说就是

  • 作为最上层的View
  • 作为一个 容器与一个或者多个子View进行交互

下面我们一起先来看一下我们实现的效果图

动态图

结合ToolBar

结合ViewPager

ViewPager

结合ViewPager的视觉特差


AppBarLayout

它是继承与LinearLayout的,默认 的 方向 是Vertical

类型 说明
int SCROLL_FLAG_ENTER_ALWAYS When entering (scrolling on screen) the view will scroll on any downwards scroll event, regardless of whether the scrolling view is also scrolling.
int SCROLL_FLAG_ENTER_ALWAYS_COLLAPSED An additional flag for ‘enterAlways’ which modifies the returning view to only initially scroll back to it’s collapsed height.
int SCROLL_FLAG_EXIT_UNTIL_COLLAPSED When exiting (scrolling off screen) the view will be scrolled until it is ‘collapsed’.
int SCROLL_FLAG_SCROLL The view will be scroll in direct relation to scroll events.
int SCROLL_FLAG_SNAP Upon a scroll ending, if the view is only partially visible then it will be snapped and scrolled to it’s closest edge.
类型 说明
int SCROLL_FLAG_ENTER_ALWAYS W((entering) / (scrolling on screen))下拉的时候,这个View也会跟着滑出。
int SCROLL_FLAG_ENTER_ALWAYS_COLLAPSED 另一种enterAlways,但是只显示折叠后的高度。
int SCROLL_FLAG_EXIT_UNTIL_COLLAPSED ((exiting) / (scrolling off screen))上拉的时候,这个View会跟着滑动直到折叠。
int SCROLL_FLAG_SCROLL 这个View将会响应Scroll事件
int SCROLL_FLAG_SNAP 在Scroll滑动事件结束以前 ,如果这个View部分可见,那么这个View会停在最接近当前View的位置

我们可以通过两种 方法设置这个Flag

  • 方法一
1
setScrollFlags(int) 
  • 方法二
1
app:layout_scrollFlags="scroll|enterAlways"

注意事项

AppBarLayout必须作为CoordinatorLayout的直接子View,否则它的大部分功能将不会生效,如layout_scrollFlags等。

首先我们先来看一下我们 效果图一是怎样实现的

代码

1
2
3
4
5
6
7
8
9
10
11
12
13
14
15
16
17
18
19
20
21
22
23
24
25
26
27
28
29
30
31
32
33
34
35
36
37
38
39
40
41
42
<android.support.design.widget.CoordinatorLayout
android:id="@+id/main_content"
xmlns:android="http://schemas.android.com/apk/res/android"
xmlns:app="http://schemas.android.com/apk/res-auto"
android:layout_width="match_parent"
android:layout_height="match_parent">

<android.support.design.widget.AppBarLayout
android:id="@+id/appbar"
android:layout_width="match_parent"
android:layout_height="wrap_content"
android:theme="@style/ThemeOverlay.AppCompat.Dark.ActionBar">

<android.support.v7.widget.Toolbar
android:id="@+id/toolbar"
android:layout_width="match_parent"
android:layout_height="?attr/actionBarSize"
android:background="?attr/colorPrimary"
app:layout_scrollFlags="scroll|enterAlways"
app:popupTheme="@style/ThemeOverlay.AppCompat.Light"/>

.


</android.support.design.widget.AppBarLayout>

<android.support.v7.widget.RecyclerView
android:id="@+id/recyclerView"
android:layout_width="match_parent"
android:layout_height="match_parent"
app:layout_behavior="@string/appbar_scrolling_view_behavior"/>

<android.support.design.widget.FloatingActionButton
android:id="@+id/fab"
android:layout_width="wrap_content"
android:layout_height="wrap_content"
android:layout_gravity="end|bottom"
android:layout_margin="15dp"
android:src="@drawable/add_2"/>

</android.support.design.widget.CoordinatorLayout>

思路 分析

从图中我们可以知道 layout_scrollFlags=”scroll|enterAlways,
前面已经说到layout_scrollFlags=scroll的时候,这个View会 跟着 滚动 事件响应,
layout_scrollFlags=“enterAlways”的时候 这个View会响应下拉事件
所以呈现出来的结果应该是我们在上拉的时候toolBar 会隐藏,下拉的时候toolBar会出来

那如果当我们的toolBar 等于 app:layout_scrollFlags=”scroll|snap”的时候 ,
layout_scrollFlags=scroll的时候,这个View会 跟着 滚动 事件响应,
layout_scrollFlags=“snap”的时候 在Scroll滑动事件结束以前 ,如果这个View部分可见,那么这个View会停在最接近当前View的位置。
综上呈现的效果如下,代码见ToolBarSampleSnar的布局文件

结合ViewPager

布局代码如下

1
2
3
4
5
6
7
8
9
10
11
12
13
14
15
16
17
18
19
20
21
22
23
24
25
26
27
28
29
30
31
32
33
34
35
36
37
38
39
40
41
42
43
44
45
46
47
48
49
<android.support.design.widget.CoordinatorLayout
android:id="@+id/main_content"
xmlns:android="http://schemas.android.com/apk/res/android"
xmlns:app="http://schemas.android.com/apk/res-auto"
android:layout_width="match_parent"
android:layout_height="match_parent">

<android.support.design.widget.AppBarLayout
android:layout_width="match_parent"
android:layout_height="250dp">


<ImageView android:layout_width="match_parent"
android:layout_height="200dp"
android:background="?attr/colorPrimary"
android:scaleType="fitXY"
android:src="@drawable/tangyan"
app:layout_scrollFlags="scroll|enterAlways"/>

<android.support.design.widget.TabLayout
android:id="@+id/tabs"
android:layout_width="match_parent"
android:layout_height="wrap_content"
android:layout_alignParentBottom="true"
android:background="?attr/colorPrimary"
app:tabIndicatorColor="@color/colorAccent"
app:tabIndicatorHeight="4dp"
app:tabSelectedTextColor="#000"
app:tabTextColor="#fff"/>

</android.support.design.widget.AppBarLayout>


<android.support.v4.view.ViewPager

android:id="@+id/viewpager"
android:layout_width="match_parent"
android:layout_height="match_parent"
app:layout_behavior="@string/appbar_scrolling_view_behavior"/>

<android.support.design.widget.FloatingActionButton
android:id="@+id/fab"
android:layout_width="wrap_content"
android:layout_height="wrap_content"
android:layout_gravity="end|bottom"
android:layout_margin="15dp"
android:src="@drawable/add_2"/>

</android.support.design.widget.CoordinatorLayout>

思路分析

其实相对于前 一个例子,只是把 摆放RecyclerView 的位置替换成ViewPager而已,为了有页面导航器的效果,再使用 TabLayout而已,而TabLayout 在我们滑动的时候最终会停靠在 最顶部,是因为我们没有设置其layout_scrollFlags,即TabLayout是静态的

运行以后,即可看到以下的结果

ViewPager

下面我们一起来看一下 TabLayout是怎样结合ViewPager直线 导航器的效果的

代码注释 里面已经解释地很清楚了 ,这里我就不解释了

1
2
3
4
5
6
7
8
9
10
11
12
13
14
15
16
17
18
19
20
21
22
23
24
25
26
27
28
29
30
31
32
33
34
35
36
37
38
39
public class ViewPagerSample extends AppCompatActivity {

ViewPager mViewPager;
List<Fragment> mFragments;

String[] mTitles = new String[]{
"主页", "微博", "相册"
};
private TabLayout mTabLayout;

@Override
protected void onCreate(Bundle savedInstanceState) {
super.onCreate(savedInstanceState);
setContentView(R.layout.activity_third);
// 第一步,初始化ViewPager和TabLayout
mViewPager = (ViewPager) findViewById(R.id.viewpager);
mTabLayout = (TabLayout) findViewById(R.id.tabs);
setupViewPager();
}

private void setupViewPager() {

mFragments = new ArrayList<>();
for (int i = 0; i < mTitles.length; i++) {
ListFragment listFragment = ListFragment.newInstance(mTitles[i]);
mFragments.add(listFragment);
}
// 第二步:为ViewPager设置适配器
BaseFragmentAdapter adapter =
new BaseFragmentAdapter(getSupportFragmentManager(), mFragments, mTitles);

mViewPager.setAdapter(adapter);
// 第三步:将ViewPager与TableLayout 绑定在一起
mTabLayout.setupWithViewPager(mViewPager);
}


}

如果我们想更改Indicator的相关样式,我们可以在布局文件里面使用

1
2
3
4
5
6
7
8
9
10
11
12
<android.support.design.widget.TabLayout
android:id="@+id/tabs"
android:layout_width="match_parent"
android:layout_height="wrap_content"
android:layout_alignParentBottom="true"
android:background="?attr/colorPrimary"
app:tabIndicatorColor="@color/colorAccent"
app:tabIndicatorHeight="4dp"
app:tabSelectedTextColor="#000"
app:tabTextColor="#fff"/>


如果你不想使用Google 帮我们 封装好的控件的话,你也可以自己自定义一个控件,你可以参考我的这一篇博客仿网易新闻的顶部导航指示器


在看例子结合ViewPager的视觉特差之前 ,我们需要先了解CollapsingToolbarLayout这个控件

CollapsingToolbarLayout

CollapsingToolbarLayout继承与FrameLayout,官网地址,请自备梯子。

简单来说 ,CollapsingToolbarLayout是工具栏的包装器,它通常作为AppBarLayout的孩子。主要实现以下功能

  • Collapsing title(可以折叠 的 标题 )
  • Content scrim(内容装饰),当我们滑动的位置 到达一定阀值的时候,内容 装饰将会被显示或者隐藏
  • Status bar scrim(状态栏布)
  • Parallax scrolling children,滑动的时候孩子呈现视觉特差效果
  • Pinned position children,固定位置的 孩子

下面我们一起来看一下几个常量

常量 解释说明
int COLLAPSE_MODE_OFF The view will act as normal with no collapsing behavior.(这个 View将会 呈现正常的结果,不会表现出折叠效果)
int COLLAPSE_MODE_PARALLAX The view will scroll in a parallax fashion. See setParallaxMultiplier(float) to change the multiplier used.(在滑动的时候这个View 会呈现 出 视觉特差效果 )
int COLLAPSE_MODE_PIN The view will pin in place until it reaches the bottom of the CollapsingToolbarLayout.(当这个View到达 CollapsingToolbarLayout的底部的时候,这个View 将会被放置,即代替整个CollapsingToolbarLayout)

我们有两种方法可以设置这个常量,

方法一:在代码中使用这个方法

1
setCollapseMode(int collapseMode)

方法 二:在布局文件中使用自定义属性

1
app:layout_collapseMode="pin"

到此 ,CollapsingToolbarLayout的一些重要属性已经讲解完毕,下面我们一起来看一下我们是怎样结合ViewPager实现视差效果的


结合ViewPager的视觉特差

布局代码

1
2
3
4
5
6
7
8
9
10
11
12
13
14
15
16
17
18
19
20
21
22
23
24
25
26
27
28
29
30
31
32
33
34
35
36
37
38
39
40
41
42
43
44
45
46
47
48
49
50
51
52
53
54
55
56
57
58
59
60
61
62
63
64
65
66
67
68
69
70
71
72
73
74
75
76
77
78
79
80
81
<?xml version="1.0" encoding="utf-8"?>

<android.support.design.widget.CoordinatorLayout
xmlns:android="http://schemas.android.com/apk/res/android"
xmlns:app="http://schemas.android.com/apk/res-auto"
android:layout_width="match_parent"
android:layout_height="match_parent"
android:background="@android:color/background_light"
android:fitsSystemWindows="true"
>

<android.support.design.widget.AppBarLayout
android:id="@+id/main.appbar"
android:layout_width="match_parent"
android:layout_height="300dp"
android:fitsSystemWindows="true"
android:theme="@style/ThemeOverlay.AppCompat.Dark.ActionBar"
>

<android.support.design.widget.CollapsingToolbarLayout
android:id="@+id/main.collapsing"
android:layout_width="match_parent"
android:layout_height="250dp"
android:fitsSystemWindows="true"
app:contentScrim="?attr/colorPrimary"
app:expandedTitleMarginEnd="64dp"
app:expandedTitleMarginStart="48dp"
app:layout_scrollFlags="scroll|exitUntilCollapsed"
>

<ImageView
android:id="@+id/main.backdrop"
android:layout_width="match_parent"
android:layout_height="match_parent"
android:fitsSystemWindows="true"
android:scaleType="centerCrop"
android:src="@drawable/tangyan"
app:layout_collapseMode="parallax"
/>

<android.support.v7.widget.Toolbar
android:id="@+id/toolbar"
android:layout_width="match_parent"
android:layout_height="?attr/actionBarSize"
app:layout_collapseMode="pin"
app:popupTheme="@style/ThemeOverlay.AppCompat.Light"
/>
</android.support.design.widget.CollapsingToolbarLayout>

<android.support.design.widget.TabLayout
android:id="@+id/tabs"
android:layout_width="match_parent"
android:layout_height="wrap_content"
android:layout_alignParentBottom="true"
android:background="?attr/colorPrimary"
app:tabIndicatorColor="@color/colorAccent"
app:tabIndicatorHeight="4dp"
app:tabSelectedTextColor="#000"
app:tabTextColor="#fff"/>
</android.support.design.widget.AppBarLayout>


<android.support.v4.view.ViewPager
android:id="@+id/viewpager"
android:layout_width="match_parent"
android:layout_height="match_parent"
app:layout_behavior="@string/appbar_scrolling_view_behavior">

</android.support.v4.view.ViewPager>


<android.support.design.widget.FloatingActionButton
android:id="@+id/fab"
android:layout_width="wrap_content"
android:layout_height="wrap_content"
android:layout_gravity="end|bottom"
android:layout_margin="15dp"
android:src="@drawable/add_2"/>

</android.support.design.widget.CoordinatorLayout>

效果图如下

思路解析

  • 结构图如图片所示,先说明CollapsingToolbarLayout的变化

    CollapsingToolbarLayout里面 包含ImageView 和ToolBar,ImageView的app:layout_collapseMode=”parallax”,表示视差效果,ToolBar的 app:layout_collapseMode=”pin”,当这个TooBar到达 CollapsingToolbarLayout的底部的时候,会代替整个CollapsingToolbarLayout显示

  • 接着说明TabLayout的变化

    从前面的描述我们已经知道当 没有指定app:layout_scrollFlags的时候,最终TabLayout会静止,不会随着滑动的 时候消失不见

拓展

如果我们仅仅 改变CollapsingToolbarLayout的app:layout_scrollFlags=”scroll|exitUntilCollapsed|snap”的时候,其它代码不变,运行以后,我们将可以看到如下效果图


总结

这篇博客主要讲解了CoordinatorLayout,AppBarLayout,CollapsingToolbarLayout的一些相关属性。

  • 对于AppBarLayout,我们主要 讲解了这个属性app:layout_scrollFlags,设置不同 的属性我们可以在滚动的时候显示不同 的效果
  • 对于CollapsingToolbarLayout,我们主要讲解了app:layout_collapseMode这个属性,设置不同的值,我们可以让其子View呈现不同的 炫酷效果,如parallax和pin等

CoordinatorLayout的相关用法还有很多,有兴趣 了解的请自行阅读: 官方文档地址


题外话

CoordinatorLayout这个控件真的很强大,使用它可以实现各种炫酷的效果,简化了开发者的许多工作,有能力的话可以去研究一下源码 ,看是怎样实现的?

参考文章:android-[译]掌握CoordinatorLayout

源码下载地址:https://github.com/gdutxiaoxu/CoordinatorLayoutExample.git

找到我

我是站在巨人的肩膀上成长起来的,同样,我也希望成为你们的巨人。觉得不错的话可以关注一下我的微信公众号程序员徐公,在此感谢各位大佬们。主要分享

1.Android 开发相关知识:包括 java,kotlin, Android 技术。
2.面试相关分享:包括常见的面试题目,大厂面试真题、面试经验套路分享。
3.算法相关学习笔记:比如怎么学习算法,leetcode 常见算法总结,跟大家一起学习算法。
4.时事点评:主要是关于互联网的,比如小米高管屌丝事件,拼多多女员工猝死事件等

希望我们可以成为朋友,成长路上的忠实伙伴!